Fall for Pumpkin Protein Balls this Season (See What I Did There?)

I look forward to October every year for one simple reason: it’s Pumpkin Everything Season! And despite living in Southwest Florida where the temperature rarely drops below 60 degrees, once autumn shows up on the calendar, I morph into that girl.

pumpkin-everything-season

Yep, I’m basic apparently. So sue me. Fall is a glorious time. And pumpkins are a direct result of that gloriousness.

These seasonal superfoods are rich in Vitamin A to promote vision health, Fiber to increase digestive regularity, Antioxidants to support immune function, Potassium to stimulate post-workout energy and Carotenoids to reduce skin aging effects.

Plus, they get all the Instagram likes, so…

But I digress. If you wanna experience those nutritional benefits for yourself, not just during autumn but year-round too (Why isn’t the PSL Summer Edition a thing? Looking at you, Starbucks!), might I suggest these no-bake Pumpkin Quinoa Protein Balls.

They’re perfect for a healthy plant-based breakfast or afternoon snack. And, all basicness aside, they taste like fall is supposed to taste. *insert brown leaf emoji*

I rest my case.

pumpkin-quinoa-protein-balls

yields 2 dozen protein balls

Ingredients:

1 can Pumpkin Purée (organic)

1 tbsp. Sunflower Butter (organic)

1/3 c. Rolled Oats (whole grain)

1/4 c. Quinoa (organic)

1 Apple (peeled & diced)

1/2 tsp. Pumpkin Spice

1/2 tsp. Cinnamon

1/4 tsp. Ginger

pumpkin-quinoa-protein-balls-ingredients

 Preparation:

  1. Cook the quinoa according to its package instructions, then set aside.
  2. Combine the pumpkin purée, rolled oatssunflower buttercinnamon, ginger and pumpkin spice in a mixing bowl.
  3. Slice the apple into small chunks, then stir into the pumpkin mixture.
  4. Add the cooked quinoa to the pumpkin mixture, then stir these ingredients until thoroughly combined.
  5. Divide the batter into bite-sized balls and place in the freezer for 1 hour before serving.

pumpkin-quinoa-protein-balls-batter

pumpkin-quinoa-protein-balls-before-photo

pumpkin-quinoa-protein-balls-after-photo

So. Much. Yes.

Yes Please to Cheese-less Mac & Cheese!

For the past couple months, I’ve been switching over to a dairy-free lifestyle. Which actually hasn’t been that hard of a transition. Well…except for one detail.

Guys, I love cheese.

And it’s not until I stopped eating cheese that I began realizing just how many recipes include the stuff. Craving some comfort food? Good luck sans the cheddar. In a Mexican mood? Not without that pepper jack. How about a Greek salad? Umm…don’t forget the feta.

Sure. I could simply omit cheese from these dishes, but where’s the pleasure in that? There’s gotta be another solution. At which point you’re probably thinking: Yeah, genius. It’s called vegan cheese. Touché. But I’m new at this dairy-free business!

Besides, I’m not about scouring Whole Foods for nutritional yeast. Or soaking cashews in water for three hours. Or you know…whatever.

The point is I’m lazy and need that cheese fix like yesterday.

Which is the inspiration behind my own formula: Minimum Patience + Maximum Desire = Liquid Gold Sauce in Under 5 Minutes.

vegan-cheese-sauce

In keeping with a minimalist theme, I opted for the pre-sliced variety. So, after comparing ingredients in multiple brands, Chao made the final cut. It’s tofu and coconut-based without any preservatives or GMOs. To sum up, I’m fangirling.

Yep. Over tofu and coconuts. I mean…we’ve all been there.

Something else I’m fangirling over: mac & cheese. And quinoa. Because I’m a wellness blogger. And. We. Eat. Quinoa. So, that combination is how Cheese-less Broccoli Quinoa Mac & Cheese became a thing.

And my taste buds lived happily ever after!

broccoli-quinoa-mac-and-cheese

Ingredients:

1/2 Broccoli Head (chopped into florets)

1 cup Dairy-Free Milk (Unsweetened)

2 Vegan Cheese Slices (of Preference)

1/2 cup Quinoa (Organic)

1 tbsp. Extra-Virgin Olive Oil

2 tbsp. Spelt Flour*

1/2 tsp. Garlic Powder

1/2 tsp. Sea Salt

*spelt contains gluten, so if you need a GF alternative, check out these options.

quinoa-mac-and-cheese-ingredients

Preparation:

  1. Cook the quinoa on your stovetop, following the package instructions.
  2. Pre-heat a saucepan on another stovetop burner, bring to medium, then add the milk, flour, olive oil, garlic and sea salt.
  3. Stir until the consistency thickens, then add your preferred vegan cheese and stir again until melted.
  4. Pre-heat a smaller saucepan on yet another stovetop burner, pour in about 1 inch of water, bring to boil, then add the broccoli.
  5. Reduce the heat to medium, then cover your saucepan and steam the broccoli for 5 minutes.
  6. Combine the broccoli and quinoa, then pour the vegan cheese sauce on top, and stir to distribute the flavors evenly.

quinoa-mac-and-cheese-collage

Yeaaaaah. I know what you’re making for dinner tonight. Don’t even pretend otherwise. But like…it’s healthy mac & cheese. Why wouldn’t you make it for dinner tonight?

shrugging

Exactly. *drops wooden spoon*

Breadless Toast: Madness, Genius or Just Plain Deliciousness?

Today’s kitchen creation is being served with a confession on the side.

I’m not a bread person.

Did you even know that’s a thing? To not like bread? My secret shame. Nope, can’t even order avocado toast for Sunday Brunch despite my all-consuming avoddiction (P.S. that word DOES exist. Look it up).

But *insert sigh of relief* order is now restored to the galaxy because I’ve discovered a breadless alternative—sweet potato toast. A.K.A. the latest foodie trend currently taking over my life. Forreal.

And if plant-based + gluten-free + downright delectable sounds like the ultimate jam, then prepare for a takeover on your life too.

I rest my case. Times three, in fact. Because you’re about to experience…

sweet potato toast three ways

Just grab a sweet potato, then go culinary crazy with all the fixings. And here’s some inspo to get those creative juices (not to mention, appetite!) flowing.


Ingredients:

sweet potato toast savory ingredients2 tbsp. Extra Virgin Olive Oil

1 small can Chickpeas

1/2 tsp. Ground Paprika

1/4 tsp. Ground Cumin

1 Juiced Lemon

                             sweet potato toast sweet ingredients

2 tbsp. Chopped Raw Almonds

1 tbsp. Organic Almond Butter

1/2 tsp. Ground Cinnamon

1/2 Sliced Apple

sweet potato toast spicy ingredients

1/2 tsp. Sriracha Sauce

4-5 Spinach Leaves

1/2 Hass Avocado

1/4 tsp. Sea Salt


 Preparation:

  1. Cut the Potato into 3 slices about, 1/4-inch thick, leaving the skin on.
  2. Put each slice in a toaster and cook for 5 minutes, or until the texture becomes pliable but still firm.
  3. Drain and rinse the Chickpeas, then transfer 1/2 into a food processor.
  4. Add the Lemon and 1 tbsp. Olive Oil, then puree this mixture until a hummus consistency forms.
  5. Place the remaining Chickpeas on a foil-lined baking sheet and pre-heat the oven to 375 degrees.
  6. Drizzle them with 1 tbsp. Olive Oil, Cumin and Paprika, then cook in the oven for 10 minutes, or until the Chickpeas become crispy.
  7. Spread the hummus over the first Potato slice and top with the roasted Chickpeas to make savory toast.
  8. Chop the Almonds coarsely and slice the Apple, then spread Almond Butter over the second Potato slice.
  9. Top with the Apples, Almonds and Cinnamon to make sweet toast.
  10. Mash the Avocado until a guacamole consistency forms and spread over the third Potato slice.
  11. Top with the Spinach and Sea Salt, then drizzle on Sriracha to make spicy toast.

Seriously…moment of silent introspection for these wondrous little tubers.

Alright, moment over. Girl’s gotta eat!

Make Your Mornings Count With a Dash of Matcha Madness

So, guess I’ve been feeling the Eastern vibes lately. Between last week’s Korean Boribap recipe and this week’s love letter to all things matcha, I should probably just book a flight to Asia. Donate to my travel fund, and I’ll get right on that!

No takers? Shocking. Fine then…living vicariously through my taste buds isn’t the worst consolation prize. Lucky for this girl, my fiancé’s sister did go to Asia recently, and she brought me back some authentic ceremonial-grade Japanese matcha.

Talk about earning brownie points with the future sis-in-law. Give me pretentious sounding superfoods, and I’m your friend for life. Well played, Kristin…well played.

If you’re a matcha virgin, it’s literally just powdered green tea. Observe:

matcha powder

But what makes it so freaking fabulous? Check out these impressive stats:

  • Yields more antioxidants than any other superfood including goji berries, acai, kale and spinach.
  • Contains a powerful blend of essential nutrients like fiber, chlorophyll, zinc, magnesium, and Vitamin C.
  • Strengthens immune function, promotes anti-inflmmatory benefits and works like a natural detoxifier.
  • Boosts the metabolism to burn calories more efficiently, and regulates healthy cholesterol levels.
  • Reduces physical and mental stress, enhances concentration and balances fluctuating mood states.

Way to kick some nutritional ass, Matcha! And that’s why I jumpstart each morning with this little green powerhouse I’ve become *slightly* dependent on. Sure, you can drink it like the socially acceptable human you are. OR you can get creative, steal a chapter from my cookbook…

And breakfast will never be the same.

matcha for breakfast

MATCHA GINGER OATMEAL

Ingredients:

1 cup Cashew Milk (unsweetened)

1/2 cup Whole-Grain Oats

2 tsp. Matcha Powder

2 packets Stevia (organic)

1 tsp. Almond Butter (all-natural)

2–3 pinches Sesame Seeds

1/4 tsp. Ground Ginger

Preparation:

  1. Pour the Cashew Milk into a small saucepan and preheat the stovetop burner on a medium-high setting.
  2. Add the Oats and stir occasionally until the mixture begins to boil, then reduce to a simmer and continue stirring until the texture thickens.
  3. Remove the saucepan from the stove, add the Matcha, Ginger and Stevia, then stir to combine.
  4. Transfer the oatmeal into a serving bowl, then top with Almond Butter and Sesame Seeds for extra crunch. (NOTE: feel free to use whatever toppings you prefer…I just choose sesame seeds in keeping with our Asian theme!)

matcha oatmeal before pic

matcha oatmeal after pic

MATCHA BLUEBERRY PANCAKES

Ingredients:

1 cup Cashew Milk (unsweetened)

3/4 cup Spelt Flour (or, a GF alternative)

1/3 cup Fresh Blueberries

1/2 tbsp. Matcha Powder

2 packets Stevia (organic)

2 tsp. Almond Butter (all-natural)

Preparation:

  1. Pour the Cashew Milk and Spelt Flour into a mixing bowl, then stir vigorously until no lumps remain.
  2. Add the Blueberries, Matcha and Stevia into this batter, then stir again to combine.
  3. Preheat the stovetop burner on a medium-high setting, place a griddle on this burner and coat with non-stick cooking spray.
  4. Ladle the batter in small batches onto the griddle, allow to cook about 2 minutes on each side, then transfer the pancakes to a serving plate once they’re done.
  5. Spread the Almond Butter over the pancake stack and garnish with leftover blueberries, if desired.

matcha pancakes before pic

matcha pancakes after pic

Reader Poll (just because I’m curious): Do you cook with matcha, or are you a purist who thinks tea is for drinking, thankyouverymuch?

So, What’s the Deal With that “Buddha Bowl” Bandwagon?

Lately, my entire Pinterest feed has turned into one continuous love letter to the gloriousness that is a Buddha Bowl. I’ve been hearing this term used more and more in wellness circles, but it’s taken me awhile to join the “Buddha Bowl Bandwagon.” Well, until last weekend anyway.

On a random Saturday night, the fiancé and I were embroiled in our usual debate: should we make dinner reservations, grab some take-out, or just raid the fridge? Laziness won out (’cause my spirit animal is a 65-year-old in threadbare sweats who calls “lights out” before 10pm), so we settled on Option #3. Then, inspiration struck—Hey…I’ll make one of those Buddha Bowl things!

So, through trial-and-error, I debunked the basic formula and concocted my own variation. And now that I’ve graduated from Buddha Bowl virgin to Buddha Bowl addict, I’m passing this formula along to you.

(WARNING: contents might cause obsession!)

how to make a buddha bowl

1.   Building Blocks—What Components Will You Need?

  • The Base: choose a whole grain like quinoa, brown rice, bulgur, wheatberry or farro.
  • The Greens: choose leafy greens like spinach, kale, arugula, chard or watercress.
  • The Protein: choose a plant-based protein like chickpeas, almonds, beans, tempeh or tofu.
  • The Extras: choose veggies like sweet potato, broccoli, asparagus, carrots or avocado (okay…not a veggie, but still delish).
  • The Dressing: choose a sauce like the flavor bomb pictured above. Wanna make it? Then, stay tuned…

2.   Assembly Required—How Do You Put It All Together?

  • The First Layer: cook the whole grains according to their package instructions, then spread onto the bottom of your bowl.
  • The Second Layer: arrange a handful of leafy greens over the whole grain base.
  • The Third Layer: oven roast the protein source (or, leave raw if desired and safe to consume), then arrange over the leafy greens.
  • The Fourth Layer: steam the veggies until tender, then arrange over the leafy greens.
  • The Top Layer: drizzle the sauce to evenly coat the veggies. Oh, and here’s that recipe I hinted at earlier…blend together 1 red pepper,       1 garlic clove, 2 tbsp. lemon juice, 1 tbsp. olive oil, 1/2 tsp. paprika, 1/4 tsp. turmeric, 1/4 tsp. coriander and 1/4 tsp. cumin. Viola!
buddha bowl finished product

couldn’t resist posting ANOTHER shot of my finished product in all its glory

Alrighty. That’s the gameplan, people. So, welcome aboard that Buddha Bowl Bandwagon—where dinnertime dilemmas have met their match!

Superfood Spotlight: Edamame Goes Green for Spring

With the weather warming up—or heating up if you’re a Sunshine State dweller like me—in preparation for glorious spring, this time of year makes me crave all things green. Especially in the kitchen, amiright?!

And because I’m feeling Green Goddess-y at the moment, my latest recipe sorta resembles a leprechaun explosion. St. Patrick’s Day is next week, after all! The perfect appetizer for a weekend cookout, this fresh and vibrant take on hummus is also loaded with plant-based protein.

Gotta love health benefits disguised as flavor bombs, so feature this superfood spread at your next happy hour. Talk about a hit throughout swimsuit season!

Note: The recipe yields 6-8 servings, so you might need to adjust the ingredient count for larger gatherings. 

superfood snacking edamame hummus

Ingredients: 

1/2 c. Edamame (shelled)

2 tbsp. Grapeseed Oil

1 Garlic Clove (minced)

1 Lemon (juiced)

1/2 tsp. Cumin

1/4 tsp. Sea Salt

2 Thyme Sprigs

Preparation:

  1. Pre-heat a saucepan, filled with about 1 1/2 cups of Water, on a high stovetop setting.
  2. When the water reaches a boil, add the Edamame and reduce to a simmer until the they have cooked thoroughly.
  3. Turn off the heat and drain the edamame through a colander, then transfer them into a food processor or blender.
  4. Add the other Ingredients to the food processor or blender, then puree until smooth.

Serving Suggestion:

For a gluten-free alternative to store bought crackers or pita bread, enjoy this Hummus with sliced avocado and julienned tubers—like carrots or parsnips. This is also a deceptively delicious way to entice the kiddos with fresh veggies during those after-school snack attacks!

How to “Dress” Up Your Daily Fruit & Veggie Quota {Guest Post}

According to research backed by the American Heart Association, people who habitually consume a diet rich in fruits and vegetables experience a decreased risk of cardiovascular disease later in life. In fact, this study revealed that, of the 2500 test subjects monitored, women who ate about 9 daily servings and men who ate about 7 were 26% less prone to develop clogged arteries in older age.

In addition to supporting cardiovascular wellness, fresh produce contains essential nutrients like protein, antioxidants, fiber, and a plethora of other vitamins and minerals. So, incorporating more plant-based foods into your diet can yield balanced wellness and physical longevity.

The simplest, most straightforward way to boost your fruit and veggie intake is to replace that typical lunchtime sandwich with a crisp, colorful salad. Then, top it with this healthy homemade dressing which features the antioxidant-loaded nutritional supplement, Nutri Maqui. Your heart, immune system and other vital organs will thank you for giving them the nourishment they crave!


Nutri Maqui Superfruit Salad Dressing

Nutri Maqui salad dressing ingredients

Ingredients

 Â½ cup Grapeseed Oil

1 tbsp. Nutri Maqui Superfruit Juice

1 tsp. Whole-Grain Dijon Mustard

½ tsp. Lemon Juice

Nutri Maqui salad dressing preparation

Preparation

  1. Pour all ingredients into a small decanter, then whisk until they are thoroughly combined.
  1. Chop a variety of fresh fruits, vegetables and raw nuts (e.g. carrots, cucumbers, tomatoes, apples, raspberries, avocadoes, almonds, cashews), then arrange them over a bed of leafy greens (e.g. spinach, kale, arugula).
  1. Drizzle the dressing on top, then toss the salad to evenly distribute all ingredients before serving.

So. Many. Colors. Amiright?!

Nutri Maqui salad dressing before   Nutri Maqui salad dressing after


Huge thanks to Nutri Lifescience, LLC, for supplying the research, content and graphics for this post.


Let the Side Dish Take Center Stage this Holiday Season

Yeah, sure…Thanksgiving was a week ago. But that’s no reason to take the seasonal eats out of rotation. Not yet, anyway.

And definitely not before you’ve tried my Cranberry, Orange & Pecan Chutney. This recipe is vegan, refined sugar-free and contains natural ingredients. With a tart and tangy flavor, full-bodied texture and festive color combo, this crowd-pleasing side dish will make your holiday celebrations both merry and bright.

Plus, cranberries are extremely nutrient-dense (we’re talking antioxidants, fiber and Vitamin C!). So…there’s that.

Cranberry Relish recipe

Ingredients:

12-oz. Cranberries (fresh)

1 c. Orange Juice (freshly squeezed)

1/2 c. Raw Pecans (chopped)

2 tbsp. Orange Zest

1/2 tbsp. Liquid Stevia

1/4 tsp. Black Pepper

Preparation:

  1. Pre-heat a large stockpot on a high stovetop setting, pour in the Cranberries and Orange Juice, then bring to a boil.
  2. Reduce the heat to low and allow this mixture to simmer until the Cranberry skins start popping.
  3. Add the Liquid Stevia, then gently stir the mixture with a wooden spoon, while it continues to simmer.
  4. Remove the mixture from heat until it cools to room temperature.
  5. Strain the Cranberries in a colander and reserve the Orange Juice.
  6. Pulverize the Cranberries to a chunky consistency with a potato masher, then stir in the Orange Zest and Black Pepper.
  7. Pour the reserved Orange Juice into this mixture, stir to combine,       and refrigerate until cold.
  8. Sprinkle the chopped Pecans on top right before serving to add             a little extra crunch.

Cranberry Relish close-up

Cue. All. The. Drools.

Mighty Nut: the Protein Powder of Champions + Giveaway

I first discovered Peanut Butter & Co back in college when surviving on PB&J sammies was an occupational hazard of dorm life. The creamy texture, finger licking flavors and all-natural ingredients powered me through everything from finals cram sessions (thanks for the 4.0, PB & Co!) to weekend Netflix binges (damn, I miss college sometimes!).

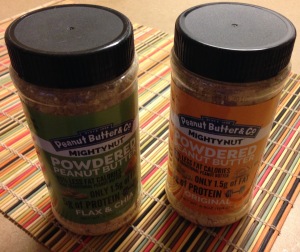
So, when I recently discovered PB & Co’s Mighty Nut protein powder, I just couldn’t resist. Not only does this product deliver all the smooth, silky lusciousness of traditional peanut butter, the finely ground consistency lends itself to baking, blending, sprinkling and more!

From smoothies to oatmeal, Mighty Nut is a convenient — and indulgent — way to meet your daily protein quota.

mighty nut powdered peanut butter

Here’s what you’ll find in each (2 tbsp.) serving:

  • 85% less fat calories than regular peanut butter
  • vegan, gluten-free and non-GMO certified
  • 5-6 grams of protein
  • 1-2 grams of fiber
  • only 1-2 grams of sugar
  • only 1-1.5 grams of fat

Plus, it’s available in 4 delightful varieties:

  • Original
  • Vanilla
  • Chocolate
  • Flax & Chia

I’ve specifically been playing around with the Flax & Chia flavor, so behold my latest creation — Vegan Pumpkin & Peanut Butter Muffins. Because, any excuse for fall yummies, right?!

Pumpkin Muffins

Ingredients:

1 cup Unsweetened Pumpkin Purée

3/4 cup Whole Wheat Flour*

1/2 cup Unsweetened Cashew Milk

1/4 cup Mighty Nut Peanut Butter Powder

1 tbsp. All-Natural Almond Butter

1 tsp. Pumpkin Pie Spice

1/2 tsp. Baking Soda

1/4 tsp. Cinnamon

Organic Stevia (to-taste)

*Make this recipe gluten-free by substituting any of these alternatives.

Pumpkin Muffin Ingredients

Preparation:

  1. Pre-heat your oven to 350 degrees and spray a muffin pan with non-stick cooking spray or use baking liners.
  2. Mix all the ingredients together in a medium-sized bowl until the batter is smooth and thoroughly combined.
  3. Pour the batter into each individual muffin cup (you should have enough batter to fill about 6 cups).
  4. Bake the muffins for approximately 20 minutes, or until they are completely cooked through (test with a toothpick to make sure).
  5. Allow the muffins to cool slightly for approximately 5 minutes, then give into the temptation — it’s guiltless, I swear!

Pumpkin Muffins Batter

Pumpkin Muffins Finished Product

Wanna score your own jar of Mighty Nut amazingness? Just enter my Giveaway through the following channels:

Open to U.S. residents only. Deadline to enter is October 25, midnight EST. One prize per person. If you have already won a Mighty Nut giveaway from another blog, please disclose this, so I can choose another winner. 


A Non-Beachbody Coach’s Take on Shakeology

Shakeology Flavors

I initially heard about Shakeology 6 months ago. Those first 3 months were spent in a perpetual state of skepticism. The next 3 months were spent in limbo between piqued interest and hesitation to fork over cash for a product I wasn’t sure would deliver.

Finally though, intrigue won out over financial responsibility, and 1 week later, my Super Sampler arrived in the mail. There I was — committed to trying this so-called “superfood supplement” I’d been resisting since December. No turning back now.

So, I took the plunge. Ripped open a packet. Poured some powder into the blender. Added a few ingredients lying around my fridge…

Then, I drank.

The first sip told me everything I needed to know. My eating habits would never be the same. In those .5 seconds it took to gulp down that smoothie, I became a bona fide Shakeology believer.

Since then, my mornings don’t even begin until this smoothie addict gets her Shakeology fix, which provides numerous essential nutrients in one wholesome, appetite-curbing (not to mention, ah-mazing!) meal.

In fact, according to the website, here’s what you’ll find in a single Shakeology serving:

  • Protein & Fiber: to naturally reduce hunger and unhealthy food cravings
  • Antioxidants, Phytonutrients, Vitamins & Minerals: to fight free-radical damage and support a strong immune system
  • Adaptogen Herbs: to help your body adapt and respond to the effects of stress
  • Prebiotics, Probiotics & Digestive Enzymes: to aid in nutrient absorption and promote digestive regularity

I’m not a paid distributor or Beachbody Coach. Nor is this a sponsored review that’ll earn me some sweet commission. Nope. I’m just personally attesting to the product’s incredible taste and positive results.

What can I say? It’s L-O-V-E. Love.

And logic. Because, damn, does this stuff work!

Shakeology turned my dubious trial run into a permanent lifestyle staple. That’s one “told ya so” this former skeptic will drink to anytime!

But, for all you other skeptics still at-large: maybe these RECIPES will change your mind…Go ahead: the indulgence comes completely guilt-free!

Chocolate Shakeology Smoothie:

Vegan Chocolate Shakeology Recipe

1 scoop Chocolate Shakeology Powder (or, make it Vegan)

1 tsp. Sweetener (e.g. Raw Agave Nectar, Raw Honey, Organic Stevia)

1 c. Unsweetened Cashew Milk

1/2 c. Fresh or Frozen Blackberries

1/4 c. Whole Grain Rolled Oats

1 tbsp. All-Natural Almond Butter

Strawberry Shakeology Smoothie:

Strawberry Shakeology Recipe

1 scoop Strawberry Shakeology Powder (or, make it Vegan)

1 tsp. Sweetener (e.g. Raw Agave Nectar, Raw Honey, Organic Stevia)

1 c. Unsweetened Cashew Milk

1/2 c. Fresh or Frozen Strawberries

1/2 c. Chopped Spinach Leaves

1/4 c. Whole Grain Rolled Oats

1 tbsp. All-Natural Almond Butter

Greenberry Shakeology Smoothie:

Greenberry Shakeology Recipe

1 scoop Greenberry Shakeology Powder

1 tsp. Sweetener (e.g. Raw Agave Nectar, Raw Honey, Organic Stevia)

1 c. Unsweetened Cashew Milk

1/2 c. Chopped Granny Smith Apple

1/2 c. Chopped Avocados

1/4 c. Whole Grain Rolled Oats

1 tbsp. All-Natural Almond Butter

Vanilla Shakeology Smoothie:

Vanilla Shakeology Recipe

1 scoop Vanilla Shakeology Powder

1 tsp. Sweetener (e.g. Raw Agave Nectar, Raw Honey, Organic Stevia)

1 c. Unsweetened Cashew Milk

1/2 c. Chopped Fresh or Frozen Mango

1/4 c. Whole Grain Rolled Oats

1 tbsp. All-Natural Almond Butter

And…Protein Pancakes Too!

Chocolate Shakeology Pancakes

2 scoops Chocolate Shakeology Powder

1/2 c. Almond Flour (grind 1 c. Raw Almonds in a blender or food processor)

1 Egg Yolk (or Vegan substitution)

1/2 c. Water or Unsweetened Nondairy Milk

1/4 c. Whole Grain Rolled Oats

1 tbsp. Organic Stevia Powder

Combine these ingredients in a mixing bowl. Coat a skillet with cooking spray and pre-heat on a medium stovetop setting. Ladle the pancake batter onto the skillet in approximately 1/4 c. increments and cook about 3 minutes on each side. Top the pancakes with fresh fruit and nut butter.